CAR COVERS:
Installation:
Storage Snowmobile Cover installation
How to use straps
1. Cover any sharp points (such as a windshield corner) with cloth or a sponge to avoid stressing your cover when it is stretched tight across your snowmobile.
2. Find the white label with arrows sewn in the hem of the cover – this is the front of your cover. Now stretch the cover down over your snowmobile.
3. Locate the strap A in the middle of your cover. From where the strap attaches to the cover, run the strap end with the male buckle under your snowmobile and then back up to clip it into the female buckle. Tighten the strap so that is snug, but not cinched completely tight.
Cleaning:
Clean your cover with a soft brush and some warm water. It may also be machine washed in cold water. Do not use soap, as it may remove the protective coatings added by the factory. Line dry or machine dry on air or delicate cycle.
CARE AND CLEANING: If your cover becomes dirty, it can be cleaned with lukewarm water and a soft brush. DO NOT USE SOAP—it can damage the protective coatings on the fabric.
STORAGE: To avoid mildew be sure your cover is completely dry before you store it for any extended period in its attached stuff sack.
.
Deluxe Snowmobile Cover Installation:
WARNING: When transporting your Snowmobile on a trailer or an open vehicle be sure to use and tighten all the straps—the cover could blow off and cause injury to others.
CAUTION: Failure to use and tighten all the straps when transporting your Snowmobile on a trailer or an open vehicle can cause damage to your cover or vehicle. Trailering speed cannot exceed 65 mph.
INSTALLATION:
1.Cover any sharp points (such as a windshield corner) with cloth or a sponge to avoid stressing your cover when it is stretched tight across your snowmobile.
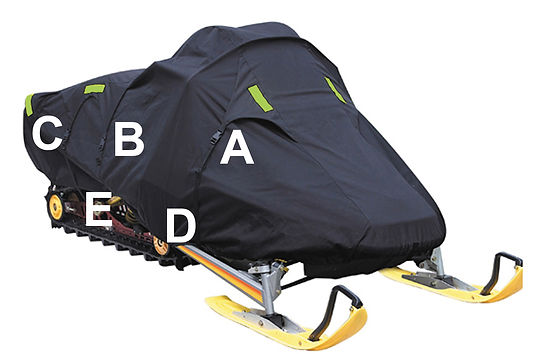
2. Find the label with arrows sewn in the hem of the cover–this is the front of your cover. Now stretch the cover down over your snowmobile making sure that the front struts are covered. There are straps and buckles for securing the front corners of the cover to the struts of the sled. Find these straps and buckles and run the male buckle around each strut and clip it to the corresponding female buckle. Pull the strap tight to secure it
3. Locate the strap [A] in the middle of your cover. From where the strap attaches to the cover, run the strap end with the male buckle under your snowmobile and then back up to clip it into the female buckle on the opposite side
4. Run the forward strap [B] under your snowmobile behind the ski struts and connect it into the buckle on the opposite side.
5. Run the rear strap [C] under the tail of your snowmobile into the buckle on the opposite side
6. There are three pairs of tension panels with webbing and metal hooks for securing the cover for trailering. The hooks can be attached to the sled or to the trailer.
a) Locate the front tension panel [D] with a webbing strap and a metal hook. Attach the metal hook to the front strut and tighten strap using the ladder lock buckle.
b) Locate the other two tension panels [E] and [F] in the seat area of your sled. Attach the metal hooks and tighten the strap using the buckles. (These straps can be removed and stored when the cover is used just for storage).
7. Tighten ALL the straps as necessary for a tight fit on your snowmobile
TRAILERING: To use your cover when transporting your Snowmobile on a trailer you MUST use all the trailering straps. Before driving check that all straps are tight and firmly attached and that the gas tank doors on the cover are shut. After driving the first mile, it’s a good idea to recheck your cover. Some additional bungee cords might be used to secure the cover which trailering, if needed.
CARE AND CLEANING: If your cover becomes dirty, it can be cleaned with lukewarm water and a soft brush. DO NOT USE SOAP—it can damage the protective coatings on the fabric.
STORAGE: To avoid mildew be sure your cover is completely dry before you store it for any extended period in its attached stuff sack.
Deluxe FULL FIT Snowmobile Cover Installation:
WARNING: When transporting your Snowmobile on a trailer or an open vehicle be sure to use and tighten all the straps—the cover could blow off and cause injury to others.
CAUTION: Failure to use and tighten all the straps when transporting your Snowmobile on a trailer or an open vehicle can cause damage to your cover or vehicle. Trailering speed cannot exceed 65 mph.
INSTALLATION:
1.Cover any sharp points (such as a windshield corner) with cloth or a sponge to avoid stressing your cover when it is stretched tight across your snowmobile.
2. Find the label with arrows sewn in the hem of the cover–this is the front of your cover. Now stretch the cover down over your snowmobile making sure that the front struts are covered. There are straps and buckles for securing the front corners of the cover to the struts of the sled. Find these straps and buckles and run the male buckle around each strut and clip it to the corresponding female buckle. Pull the strap tight to secure it
3. Locate the strap [A] in the middle of your cover. From where the strap attaches to the cover, run the strap end with the male buckle under your snowmobile and then back up to clip it into the female buckle on the opposite side
4. Run the forward strap [B] under your snowmobile behind the ski struts and connect it into the buckle on the opposite side.
5. Run the rear strap [C] under the tail of your snowmobile into the buckle on the opposite side
6. There are three pairs of tension panels with webbing and metal hooks for securing the cover for trailering. The hooks can be attached to the sled or to the trailer.
a) Locate the front tension panel [D] with a webbing strap and a metal hook. Attach the metal hook to the front strut and tighten strap using the ladder lock buckle.
b) Locate the other two tension panels [E] and [F] in the seat area of your sled. Attach the metal hooks and tighten the strap using the buckles. (These straps can be removed and stored when the cover is used just for storage).
7. Tighten ALL the straps as necessary for a tight fit on your snowmobile
TRAILERING: To use your cover when transporting your Snowmobile on a trailer you MUST use all the trailering straps. Before driving check that all straps are tight and firmly attached and that the gas tank doors on the cover are shut. After driving the first mile, it’s a good idea to recheck your cover. Some additional bungee cords might be used to secure the cover which trailering, if needed.
CARE AND CLEANING: If your cover becomes dirty, it can be cleaned with lukewarm water and a soft brush. DO NOT USE SOAP—it can damage the protective coatings on the fabric.
STORAGE: To avoid mildew be sure your cover is completely dry before you store it for any extended period in its attached stuff sack.
300 Denier Snowmobile Cover Installation:
CAUTION: Failure to use and tighten all the straps when transporting your Snowmobile on a trailer or an open vehicle can cause damage to your cover or vehicle. Trailering speed cannot exceed 65 mph. When transporting your Snowmobile on a trailer or an open vehicle be sure to use and tighten all the straps—the cover could blow off and cause injury to others.
INSTALLATION:
1.Cover any sharp points (such as a windshield corner) with cloth or a sponge to avoid stressing your cover when it is stretched tight across your snowmobile.
2. Find the label with arrows sewn in the hem of the cover–this is the front of your cover. Now stretch the cover down over your snowmobile making sure that the front struts are covered. There are straps and buckles for securing the front corners of the cover to the struts of the sled. Find these straps and buckles and run the male buckle around each strut and clip it to the corresponding female buckle. Pull the strap tight to secure it
3. Locate the strap [A] in the middle of your cover. From where the strap attaches to the cover, run the strap end with the male buckle under your snowmobile and then back up to clip it into the female buckle on the opposite side
4. Run the forward strap [B] under your snowmobile behind the ski struts and connect it into the buckle on the opposite side.
5. Run the rear strap [C] under the tail of your snowmobile into the buckle on the opposite side
6. There are three pairs of tension panels with webbing and metal hooks for securing the cover for trailering. The hooks can be attached to the sled or to the trailer.
a) Locate the front tension panel [D] with a webbing strap and a metal hook. Attach the metal hook to the front strut and tighten strap using the ladder lock buckle.
b) Locate the other two tension panels [E] and [F] in the seat area of your sled. Attach the metal hooks and tighten the strap using the buckles. (These straps can be removed and stored when the cover is used just for storage).
7. Tighten ALL the straps as necessary for a tight fit on your snowmobile
COVERING YOUR SNOWMOBILE WHEN ON A TRAILER OR ON AN OPEN VEHICLE
If you plan to cover your snowmobile while transporting it on a trailer or open vehicle you must use and carefully tighten all the provided straps to hold your cover down in the winds created by high speed travel. When first using your cover for highway travel we suggest you check your cover after you have driven a short distance. Some additional bungee cords might be needed to secure the cover.
CLEANING
Clean your cover with a soft brush and some lukewarm water. It may also be machine washed in COLD water. DO NOT USE SOAP, as it may remove the protective coatings added by the factory. Line dry or machine dry on air or delicate.
STORAGE: To avoid mildew be sure your cover is completely dry before you store it for any extended period in its attached stuff sack.
600 Denier ALL Black Snowmobile Cover Installation:
WARNING: When transporting your Snowmobile on a trailer or an open vehicle be sure to use and tighten all the straps—the cover could blow off and cause injury to others.
CAUTION: Failure to use and tighten all the straps when transporting your Snowmobile on a trailer or an open vehicle can cause damage to your cover or vehicle. Trailering speed cannot exceed 65 mph.
INSTALLATION:
Cover any sharp points (such as a windshield corner) with cloth or a sponge to avoid stressing your cover when it is stretched tight across your snowmobile.
1. Find the label with “Front” tag sewn in the hem of the cover–this is the front of your cover. Now stretch the cover down over your snowmobile making sure that the front struts are covered. There are straps and buckles for securing the front corners of the cover to the struts of the sled.
2. There are three pairs of tension panels with webbing and metal hooks for securing the cover for trailering. The hooks can be attached to the sled or to the trailer.
a) Locate the front tension panel [A] with a webbing strap and a metal hook. Attach the metal hook to the front strut and tighten strap using the ladder lock buckle.
b) Locate the other two tension panels [B] and [C] in the seat area of your sled. Attach the metal hooks and tighten the strap using the buckles. (These straps can be removed and stored when the cover is used just for storage).
3. Locate the strap [D] in the middle of your cover. Attach the metal hooks and tighten the strap using the buckles.
4. Locate the strap [E] in the tail portion of your cover. Attach the metal hooks and tighten the strap using the buckles.
5. Tighten ALL the straps as necessary for a tight fit on your snowmobile
TRAILERING: To use your cover when transporting your Snowmobile on a trailer you MUST use all the trailering straps. Before driving check that all straps are tight and firmly attached and that the gas tank doors on the cover are shut. After driving the first mile, it’s a good idea to recheck your cover. Some additional bungee cords might be used to secure the cover which trailering, if needed.
CARE AND CLEANING: If your cover becomes dirty, it can be cleaned with lukewarm water and a soft brush. DO NOT USE SOAP—it can damage the protective coatings on the fabric.
STORAGE: To avoid mildew be sure your cover is completely dry before you store it for any extended period in its attached stuff sack.
How to care for your Snowmobile Cover.
Note: All our covers CAN be washed.
Machine Washing
1. Use a commercial washer.
2. Use a delicate soap such as Woolite.
3. Set washer to "Delicate".
Drying
1. If possible, we suggest to air dry all covers.
Hand Washing
1. If hand washing your cover, we suggest you install it on your car first.
2. Dilute a mild liquid detergent like Woolite, in cold or warm water.
3. Lightly cleanse with sponge.
Weather Conditions:
Freezing Weather: In unusual circumstances, a layer of ice may form between your vehicle and the cover. This layer of ice must be thawed before removing the cover. You may expedite the thawing process by pouring warm water over the cover and gently lifting the cover as the ice begins to melt. If any resistance occurs,
repeat process.
Important:
When installing your cover for the first time, make sure that your vehicle is clean.
Caution. Please read prior to use of this cover.
-
Never cover a wet vehicle.
-
Not liable for repainted surfaces or lacquer paint. Do not use any cover on freshly painted vehicle for at least 6 month. The paint has to cure before any cover can be applied. It is the best to check with your painter or body shop for recommended "cure" time. Use of any cover on a repainted vehicle may cause damage that is not due to the cover, but due to the new paint.
-
Do not cover the tail pipe or exhaust
-
Be sure the hood and engine are cool before you put on your cover
-
This cover is water repellent but it will not prevent water from reaching the surface of your vehicle.
-
Max trailering speed for trailerable covers 50 mph - 60 mph short distance 100 miles max). Any loose material during trailering is going to damage your cover. Make sure to secure it, you might want to use some additional straps or bungee cords (if needed).
-
High Winds: If you are located in a high wind area be sure to tie down your cover using the grommets provided. Do not rely solely on the elasticized bottom of your cover to provide maximum protection from strong winds.
-
Freezing Weather: In unusual circumstances, a layer of ice may form between your vehicle and the cover. This layer of ice must be thawed before removing the cover. You may expedite the thawing process by pouring warm water over the cover and gently lifting the cover as the ice begins to melt. If any resistance occurs,
-
repeat process.
-
Avoid trapping moisture under the cover. I your vehicle is outside for long periods or under snow, trapped moisture can sometimes cause paint to become cloudy. We recommend removing your cover every 30 days. Let your vehicle dry completely before reinstalling the cover.
-
Be sure to pad all stress points so that the cover will not become ripped or torn during trailering.
-
Padding and protecting wear points and stress areas is essential to the performance of your cover, especially while trailering(if the cover is trailerable).
-
Prior to installation, we suggest the following protection methods: 1) apply duct tape to the inside of the cover where it might come into contact with sharp edges, or 2) tape pieces of foam, sponges, thick cloth or a towel over any sharp edges or stress points.
-
Failure to properly tie down the cover and pad stress points could result in considerable damage to your cover and possible damage to vehicle boat.
-
Your cover is not completely waterproof, it is water repellent. Cover any items on your storage racks that can be damaged by water in plastic